Monday, 30 March 2009

Tea Bag Folding

I have done some in the past but not much, whenever I had seen tea bag folded designs on cards I had thought they were very complicated to do and I wouldn't be able to manage them - How wrong I was

Free Craft Downloads have started to do some Tea Bag Tiles

This card is made using the Fairy Tea bag tiles


TO MAKE THE STAR BURST FRAME


You will need 7 tiles I used the fairy1 design


1) Fold the square diagonally with the the right side on the outside


2)Open out the tile and fold one side from the point in to the middle


3)Do the same with the other side making sure you have a nice neat point at the bottom


4)As the tile is facing you fold the top edge down so it is level


5)Fold the point at the bottom up to the top edge then turn the tile over ( this picture shows the tile when turned over as well)


6)Fold the narrower bottom edge up to the wider top edge (as you do that you will see the point of the triangle appear at the bottom that will be the point on the star) Underneath you will see a small "triangle" showing white as it is the wrong side just pop a dab of glue on it and fold back up


Now these are ready to assemble


Just pop a dab of glue on the right hand edge of each tile in turn and stick the next one to it until you reach the last one and glue both ends


There you have your "starburst" The shape may need some minor ajustment before the glue dries


I chose to use a part of the Fairy decoupage picture and stuck it to the underside of the frame

Then just edged the card with silver border peel offs, with a small lilac gem in each of the four corners, added a silver Happy Birthday Peel-off and a Silver butterfly peel off was put on some dark pink hand made paper and cut out and stuck using a foam pad (bend the wings up slightly)

If you use different size tiles you would get a different size frame.

Go take a look at the Fairy Tea Bag Tile Designs on Free Craft Downloads there are some really nice ones to use

Fairy Shaker Card


I love this design and had great fun making the card which I'm sure any little girl would like to receive
My daughter loved it when she saw it this morning
There is a Fantastic selection of the Fairy design in its own section on Free Craft Downloads
I know I'm going to use these quite often

I used
A 5x7 aperture card
A clear plastic bubble front
I used the Fairy Decoupage 1 and the Fairies backing paper from Free Craft Downloads
a self adhesive silver balloon
some fine beading wire
some tiny gold stars (for the shaker)
some bigger gold stars
gold wavy edge peel off
a gold bow
Some foam pads

I printed out the Fairy backing paper and the decoupage A5 size
I fixed the fairy backing paper over the front of the aperture card and trimmed around it then turned it over to cut out the aperture (easier to see that way)
Then added a gold wavy edged peel off around the front of the aperture and the edges of the card
I cut out and assembled the fairy decoupage and left it to dry also used the clear gel pen on the fairy wings and dress too
I wrapped a small length of beading wire around the end of an embossing tool to get a spring effect then glued one end to the back of the balloon and the other to the back of the fairies hand and left to dry. I did this because originally I was going to add an age on the balloon but later decided to leave it so it would be suitable for any age.
I used a clear sakura gelly roll pen to "sparkle" the fairy wings on the backing paper they look lovely when the light catches them but a bit difficult to see in the picture
I used silicone glue to attach the bubble front to the aperturue card and left that to dry
I took another small length of beading wire and wrapped around the embossing tool again for a spring effect I attached one end of this one to the back of the head of the fairy decoupage and left to dry
When all the bits were dry I started assembling the card by taking the fairy decoupage and taping it to the top of the bubble front
The idea being that when the card is shaken it looks like the fairy is flying and waving her magic wand
I sprinkled in quite few very tiny gold stars and glued a few of the larger stars to the back of the card I put some small foam pads all around the edge of the bubble so it would give the tiny stars more room to shake and not be able to escape
Double sided tape was added to the edge of the backing of the aperture card, folded it over and sealed it.
Gave it a shake - It worked!!

Get Well Card

A5 Gate-fold Card
A more simple way of using one of the Basic Templates from Free Craft Downloads
This time I used the A4 Flower Middle one.
I used the Backing Paper Builder and wrote in "Get Well" text, text angle 45, and style tile, and font Planet Benson size 12 I decided to use a plain colour for the background.

I printed it then put it back through the printer to print the Flower middle template on the other side of the card I chose to do this borderless so the blue edges didn't show only the flower part in the middle
I used some silver border peel offs to go over the edges of the flower line
Then scored the lines for an A5 gate fold card (I used a score board to make it easier)

I printed out and made up the Blue Flower decoupage It was printed on A5 size paper then stuck it in the middle of the outlined flower I printed out some more of the flower designs to use the smaller part of the flower to add to the 4 corners
on the 2 outer edges I added some light blue vellum then a white card to the centre on one I added a silver flower peel-of to the other I added a verse both sides had a couple of small flower gems added

I decided to keep the outside of the card plain added a ribbon and tied it in the middle


You can use any of the middle templates in this way

Tuesday, 24 March 2009

R. A. K. Card

One of the forums I am a member of has a "R.A.K. Club" - R.A.K stands for Random Act of Kindness and once a month you make a card for someone else on the list and you should receive one too. Obviously you know who you are sending your card to but you don't know who you are going to receive one from until it arrives

I like to Glass Paint the R.A.K. Cards I send and would like to show you the one I made for someone this month

As I have enjoyed using some of the basic templates from Free Craft Downloads I thought I would use another one for my RAK card
This time I used the A4 basic square
For the outside of the card I used
1 piece of A4 White Card
A piece of pale blue vellum
A fairy decoupage design
some small pink gems
For the inside of the card I used
1 piece of A4 White Card
1 sheet of the pink celtic backing paper from free craft downloads
The A4 basic square template
A Suncatcher that I Glass Painted

How I made the cardI folded a sheet of the white card in half to make an A5 size card, I cut out and assembled the fairy decoupage and while that was drying I paper pricked the design on to the blue vellum. After cutting it out I attached it with small dots of sillicone glue around the edge and put the fairy decoupage in the middle. where the small dots of sillicone were I put some small pink gems (as well as looking nice they cover the sillicone so it doesn't show) I then attached the pink celtic paper to the back of the outer card
I made the inside of the card by folding the other sheet of white card in half then using the square template traced around it and cut out the square centre I folded the edges in to the middle I glued the 2 outer edges on to the inside of the card giving a square pop up effect I then added a small peel off glass painted butterfly to each corner
A few days ago I glass painted a fairy bee suncatcher which I wanted to use with this card so I attached it to the middle of the square It can be removed easily if the person wishes to use it as a suncatcher


Train Card

One of Todays projects for me was a Train card made from a Train Decoupage design on Free Craft Downloads There are Backing papers inserts and tags and labels available too
It is a great design suitable for using on cards for Children.

I cut out and assembled the decoupage then found a Cloud backing paper on Free Craft Downloads I printed it A6 size as I only needed a small amount for clouds
I drew cloud shapes on the paper and cut out, edged them with a sakura gelly roll pen so they sparkled a bit

I used a blue base card and added some Gold peel offs to make a track for the train which I had coloured in with a Black peel off pen, placed the Train on the track added the "clouds" as steam and put a Happy Birthday peel off on the last one (again coloured in with a black peel off pen).
Finally I added the Childs name and age to the train


Monday, 23 March 2009

Glass Painting

This is another Craft I enjoy doing - I first came across Glass Painting when Alan and Barry were on Create and Craft a few years back I loved watching their demonstrations It looked easy so I sent for some products to have a go.
When I first started I found it wasn't as easy as it looked I did find it quite difficult especially the outlining I had a few attempts then gave up and started card making.

After about 12 months I thought I would try again - I did and stuck with it and glad I did. It has been very rewarding and I really enjoy it.
As I said I did find the outlining quite difficult at first but with encouragement from a very good friend called Bob I kept trying and although I'm not brilliant at it yet I have improved and no longer paranoid if it's not perfect.
About two and a half to three years ago I also came across a Glasspainting website.It is full of very useful Information, Designs, Projects etc. The owner of the site has also done some tutorial videos which help a great deal (you can find these videos under my blog archive on the right and also on Glasspainting.co.uk website) There is a great practice sheet for outlining on the site too.

Here is a selection of things I have painted


2 sides of a vase I painted


A clock and a Tigerlilly

A Greeting card and a Vase

Hope you like these pictures
If you have a go at glass painting don't give up try and persevere with it. It is a very rewarding and relaxing craft.

Monday, 16 March 2009

Wedding Card

After using one of the basic templates from Free Craft Downloads last week I thought I would have another go This time using one of the "front" templates rather than a "middle" one.
I have decided to use the bell (front) template and make a wedding card Here is how I did it.

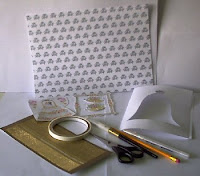
I used


The A4 bell front Template
bells 1 Backing Paper
Some gold border peel offs
Some wedding embellishments
(which I highlighted parts of with a clear sakura gelly roll pen and added a pink backing card)


How I made it
I printed out the bells backing paper on plain white card and folded the card in half so that the bells design will be on the inside and it will be an A5 size card.
I printed out the template on a separate piece of card, cut out the outline of the bell (keep this to reuse ) and placed the template on the white side of the card I am making.

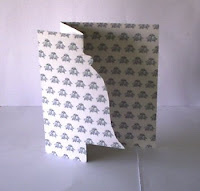
I drew around the bell in pencil, then cut out the left hand side of the bell (using a craft knife)
Fold the right hand side of card over to the left side and crease to get this


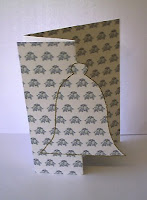
I put the bell template over the card and very faintly drew around the left side so you know where to add the peel offs.
Don't worry about the line showing, the peel offs will cover over it
If you rub it out it might affect the design on the card
Add a border peel off all around the outside edge of the bell
Now you will see the bell as a whole


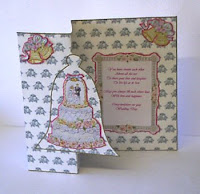
Add your embellishments to the card wherever you decide you want them.


On the inside of the card I added a verse in a frame I measured the inner frame and typed up a verse to fit then put the frame over the verse and then put it on the same pink card as the other embellishments cut around it and put it on the inside of the card in the centre


The verse I used was
You have chosen each other
Above all the rest

To share your love and laughter

To live life at its best


May you always fill each others lives
With love and happiness
Congratulations on your
Wedding Day


Hope you like the card - You can use any of the "Front" Templates in this way for any occasion

Sunday, 15 March 2009

Sunday School Card For Mothers Day

We did it

The Card I chose to make with the children was the "Coffee Cup" card using the template from Free Craft Downloads

After 2 days of printing and cutting out and miles of double sided sticky tape later I sat here this morning just before it was time to go having doubts about mass producing the "same card" a couple of hours later any doubts were very far from my mind and there was 25 "individual" cards. The Children all did very well with them and fun was had by all.
I know when their Mothers Open them they are going to be so proud of what their child made

The coffee cup card

We used
The Coffee Cup Template
A 5x7 Card
A simple "Happy Mother's Day" banner made on the computer
Some Flower embellishments printed & cut out from the Wings and Flowers CD
Some Black and White Butterflies cut from the same CD
A Teabag
A verse for the inside of the card ( * see end of posting)


How we made them
Because of not having a lot of time for Crafts in Sunday School (1/2 hour start to finish) everything was cut out ready to go
I chose to leave the black outline on the coffee cup to stand out more against the base card
The Children chose which colour card they wanted and which colour coffee cup to use
They chose which coloured banner and flowers they wanted and set about assembling their cards
The cup was stuck on to the card (some did the cards portrait some did them landscape)
The Flowers were added wherever the children chose to add them some put them on the cup some put them on the card some put them inside the card
Again the same with the butterflies I had left these black and white so the children could colour them in,
An individually wrapped teabag was put inside the cup
the verse and their own words were added inside too
A few of the children added a Flower or a Butterfly to the corner of the envelope where a stamp would go


The picture here of the finished card is the one Megan made for me. She chose to Colour a bit of the card to look like the cup was on a table

* The verse we put inside was
I would like to Thank You Mum
For all the things you've done

You deserve a rest
Because you are the best

Put your feet up
And enjoy a nice cup

Of tea
From Me


Our Project for next week in Sunday School is
A Hug in a Box


Friday, 13 March 2009

A Busy Morning

The printer has been on overtime and here is me wondering if there will be enough hours in today The reason - Mothers day cards for Sunday School.

We will be making some lovely cards for "Mum" on Sunday - Don't panic Mothers day isn't until the following Sunday (22nd March)
We are making them this week because on Mother's Day the Children will be going in to Church and handing out a Posy of Daffodils to all the Ladies there ( I think this is a lovely idea ) so we won't have time to make the cards then

I will "report back" here later on Sunday and let you all know how it went and post a Picture of the Finished Card

Best get back to it

Tuesday, 10 March 2009

The card with no name

I hadn't realised it was so long since I had posted on here, time goes by so quickly when you are having fun and keeping busy

I haven't got a clue what the "proper" name for this type of card is - If you know what they are called would you please either leave a comment to let me know or let me know through the Free Craft Downloads Forum
If you are not yet a member of the forum I hope you will consider joining us there. The members are very friendly. There is lots of help and info on there and the addition of a Quotes Database and Build your own Backing Paper Where you can make your own papers for your craft projects just follow the simple instructions there is nothing to download to your computer other than to save the paper you make

The project I'm doing here is a sample for Free Craft Downloads

From Free Craft Downloads I used


4 sheets of card. I used easter_spring_006_ls
Some leftover Tags ( easter_spring005) from another project
Template 5x7 Oval


Other items used were
Double sided tape
scraps of card card in Silver, Yellow Green and lilac
Embellishments of own choice
Seed beads in Purple and yellow
Beading wire
Peel-offs
How I made it

I printed the card in the design I wanted (even though the design prints on to A4 card make sure your printer is set to print it 5x7 size to make sure it prints the correct size

I then put the card back through the printer to print the template on the back

I cut around the blue lines to get the required size - folded it in half then cut out the oval in the middle

I then made up the "hanger" from some fine beading wire and seed beads in purple and yellow leaving bare wire at the top so it is easier to fix to the card

I put double sided tape along the three straight edges of one half of the pieces of the card and joined it to the second piece of the card, then did the same with the third piece joining it to the second then did the same with the fourth and joined it to the third.


Before joining the fourth piece of card to the first, I fixed on the "hanger" for the suspended embellishment in the middle. Then joined the fourth piece to the first piece (hope I haven't confused you there)

I chose an Easter Chick to suspend in the middle so one side to the beads then glued on a second chick so it is the same both sides.

While the glued chick was drying I got on with decorating the other sides of the card.When it is all completely dry, it folds flat to fit in a 5x7 envelope

Hope you like it