Wednesday 23 November 2011

Christmas Carollers

I have made this set from this weeks papers off Free Craft Downloads
They are the latest in the Character papers featuring Brewster, Beatrice and Bulmer as Carol singers


The papers I used were
Christmas Carollers A6 diy decoupage
Christmas Carollers Pyramid 01
Snow flakes 04
Snow flakes 04 l
I also used
2 sheets of royal blue holographic card
1 x A5 blank greeting card
2 sheets of 350gsm smooth white card
2 sheets of 220gsm white card
2 sheets of 160gsm smooth white paper
5 silver snowflakes
some royal blue ribbon with white spots on

To make these simple gift tags I printed the Carollers A6 diy decoupage sheet on to the sheet of 220gsm white card
Cut them out individually, stuck them on to one of the sheets of royal blue holographic card then cut around them again leaving a border of the blue card. I punched a hole in the top left corner and threaded some of the ribbon through


To make this gift box  I printed the snow flakes 04 backing paper on to the sheets of 350gsm smooth white card I then trimmed them to 18cm square. Using the boxer board from crafters companion I scored each side in at 4.5cm this makes it so much easier as the base  is made from one edge of the score board and then the lid is made from the opposite edge so you don't have to fiddle with measurements or trying to make sure it fits. I cut to where the score lines joined then folded and stuck together

 The bow for the top was made using some scraps of the blue holographic card I cut 6 strips 1cm wide and 6cm long, glued the edges together and trimmed to a point
 These were then stuck to the back of the snowflake as you will see in the picture
When it was dry I just shaped it a bit better,
After I had taken the picture I decided to use a small piece of the card  left over from making the box  folded it in half to make a gift tag, punched a hole in the top left hand corner and threaded some of the blue ribbon through and stuck it to the bottom of the snowflake bow before adding it to the top of the box - this can be seen on the main box picture


To make the card I used an A5 size blank greeting card as my base card, to this I stuck the snowflake 04 backing paper which had been printed on the sheet of 160gsm smooth white paper,  I printed the pyramid sheet on to the other  sheet of 220 gsm white card, cut it out and assembled using silicone glue, when dry this was mat and layered on to snow flake 04 l paper and blue holographic card.I stuck it to the right side of the base card and stuck 3 of the silver snowflakes down the left side of the card.

I chose not to add a Christmas greeting to the front of the card.

Wednesday 2 November 2011

Carol singers shaker card

Following on from the previous card 


I sometimes like to use this type of pyramid paper to make shaker cards


To make this one I used
A4 sheet of white hammered card
2 small square pieces of acetate
Snow 2 backing paper
Carol singers pyramid 2
snowman and present embellishments I had in my bits and pieces box
Happy Christmas peel off and some sparkly peel off snowflakes
some fake snow

I  folded the sheet of white card in half and stuck the snow backing paper to it and trimmed the edges
I made the reverse pyramid paper up in the same way as with the previous card but on layer 4 I stuck a piece of acetate to the top of it (so the snow doesn't fall too far down)

 To the back of layer 5 I stuck some foam pads all around the circle so the snow doesn't fall out then stuck it on top of the acetate on layer 4
A piece of acetate was then stuck to the back of layer 6 which would be the top layer then stuck the foam pads around the edge again
I added a small amount of fake snow to the centre of the assembled layers (on top of the acetate on layer 4)  then stuck the top layer down
Give it a shake and it looks like it is snowing on the Carol singers
 
I stuck it to the bottom right side of the card and stuck the snowman and present to the left side along the bottom I added some more fake snow and at the top left side I added the Happy Christmas peel off then randomly stuck some of the sparkly snowflake peel offs

Brewster the singer

Last weeks papers from  Free Craft Downloads was Brewster the singer
You will find them Here 
If you receive the Newsletter from Free Craft Downloads or are a member of the forum you will know there have been problems with the main gallery this past week and there is a new gallery now - which I'm sure you will find much easier to use  (The majority of the papers are there some of the backing papers are still being uploaded - all papers will be uploaded by the end of this week) 


This is the card I have made using the latest Brewster papers


I chose the Round "Reverse Pyramid" sheet because some people are unsure what they are or how to use them  Sometimes they are also known as "inverted pyramid" papers
This type  of decoupage is quick, easy to cut out and use and is ideal for those who find cutting out more intricate designs too difficult

To make the above card I used
1 sheet  of A4 hammered cream card
1 sheet of white pearl gold shimmer paper
An A4 sheet of blue card
Happy Birthday vertical peel off
Double sided tape
Double sided foam pads
Brewster singer 02
Guitar 06 ls l
music 02 ls l
music 01 ls  (From the teen pop papers)

I folded the A4 hammer card in half to make my base card and on to this I stuck the music 01 ls paper I then cut a piece of the guitar paper and mounted this on to a piece of  thin blue card and stuck it to the left side of the card. I then cut an even smaller piece of the (brewster) music paper and again mounted it on to a thin piece of blue card and stuck it on the guitar paper at an angle


I cut a thin strip of the guitar backing paper, stuck it down the centre of a piece of the thin blue card then added a vertical Happy Birthday peel off
This piece of card was then stuck on the right hand side of the card


 The main image from the reverse pyramid sheet was cut out and mounted on a piece of the blue card and stuck on the music paper. This had been printed on the sheet of A4 white gold shimmer paper - it glistens lovely when it catches the light (difficult to see in a picture)


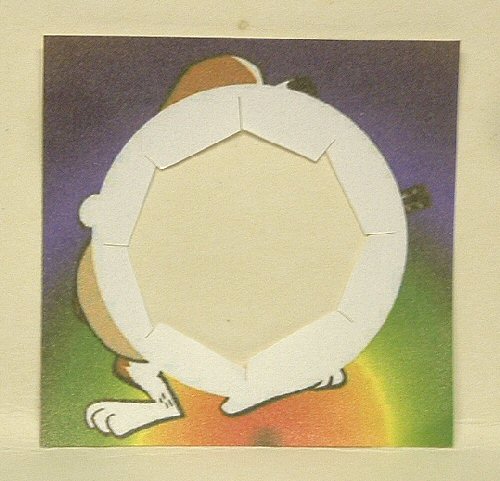
To use these reverse pyramid sheets  you need to cut out the white centre before layering them up
You will see from this picture how I choose to cut the centre out
I find it easier to use a craft knife and cut from near the outside in to the middle going all around the circle


Here you can see I snipped away the inner part this makes it easier to get the scissors in and doesn't crease your paper / card  then you just cut around the edge of the white circle on all 5 pieces
if you prefer you can just use a craft knife and cut around the edge of the circle  - If I do that sometimes I find I slip a bit with the knife and end up cutting where I don't want to.


After cutting out all the white circles I added foam pads to the back and layered them
You will see when you print out the sheet there are numbers under the parts
you stick
 6 on to 5,   5 on to 4,  4 on to 3,  3 on to 2,  and 2 on to 1


The finished card